RN Nurse Embroidery Design: A Practical Review for Real Projects
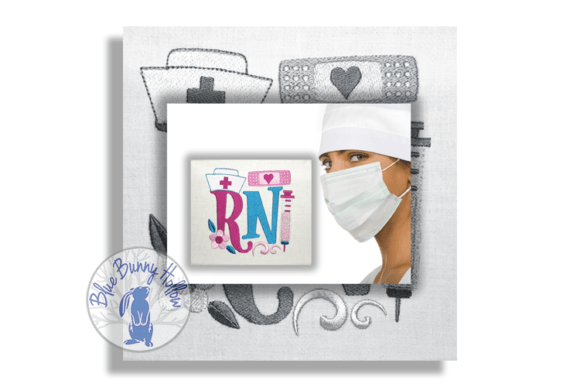
When I first opened the RN nurse embroidery file, I was curious how three small elements—a nurse’s cap, a Band-Aid, and a needle—would translate into a finished design that feels complete rather than scattered. After running several test stitches and using it across a handful of real client projects, I can say this design earns its place in the Work Occupation category. It is not flashy or oversized, and that is exactly why it works. The composition is compact, the symbols are immediately recognizable, and the overall mood is respectful without feeling stiff. For a designer who regularly produces machine embroidery design projects for nurses, medical staff, and healthcare appreciation gifts, this is a file I will keep in my active library.
First Look: What This Design Says Before It Stitches
The RN nurse design carries a quiet confidence. The nurse’s hat sits as the central visual anchor, with the Band-Aid and needle arranged around it in a way that feels balanced rather than crowded. It does not try to say everything at once. It simply says registered nurse, and it says it with symbols that anyone in healthcare will recognize immediately. The detail level is moderate. There are no ultra-thin lines that will vanish into fabric, and no massive solid areas that will turn into a stiff patch. The visual personality is professional, warm, and understated—exactly what you want when stitching for someone who works long shifts and wants their gear to reflect pride without shouting.
This design naturally belongs on items meant for daily use or gifting. I see it working beautifully on a custom tote bag for a nurse who commutes, on a sweatshirt for a casual shift or a coffee run, on a cap that will see real wear, or as an embroidered patch that can be added to a scrub jacket or a lab coat. It also fits well on baby embroidery projects—think a little onesie or a bib for a new mom who happens to be an RN. The size feels right for chest placements on adult apparel, for left-chest logos on uniform-like garments, and for the center of a pillow cover or a kitchen towel in a nurse’s break room.
Real Project Scenario: The Tote Bag That Became a Conversation Starter
I recently prepared a custom embroidered tote bag for a client who wanted a gift for a close friend graduating from nursing school. We chose the RN nurse design because it felt more personal than a generic logo and more polished than a simple text monogram. I hooped a mid-weight cotton canvas tote, used a tear-away stabilizer, and stitched the design in a navy blue thread on a natural beige bag. The result was clean, readable, and had just enough detail to catch the eye without overwhelming the fabric. The client later told me her friend carried that bag every day during her first month on the floor, and several coworkers asked where she got it. That is the kind of word-of-mouth marketing that small shop owners and Etsy sellers live for.
For a handmade product like that tote, the RN nurse design added real perceived value. It did not look like a quick iron-on transfer. It looked intentional. The satin stitch outlines on the needle and the fill stitch on the cap held their shape well, and the Band-Aid read clearly even from a few feet away. If you sell personalized gift items or run a small shop that caters to healthcare workers, this is a design you can use across multiple product lines without it feeling repetitive.
Stitching Performance: What to Expect at the Machine
From a technical standpoint, the RN nurse embroidery file performs well on most stable fabrics. I tested it on medium-weight cotton, poly-cotton blends, denim, and a structured fleece sweatshirt. On all four, the stitch density felt appropriate. The design did not pucker, and there were no unnecessary trims or jump stitches that would slow down production. The satin stitch elements, particularly on the needle and the edges of the hat, are smooth and consistent. The fill stitch areas are dense enough to cover the fabric but not so heavy that they create a hard, board-like feel.
If you stitch this design on a tote bag or an apron, you will likely not need heavy stabilization. A medium-weight cut-away stabilizer worked well for my tests. On a cap or a curved surface like a beanie, you will want to use a firm hoop and a stiff stabilizer to keep the details from distorting. The design is compact enough that it should fit most standard hoop size configurations, but I always recommend checking the actual dimensions against your hoop before committing to a production run. I also suggest testing the design on scrap fabric first, especially if you plan to stitch it on dark fabric. The thread colors you choose will dramatically affect how the Band-Aid and needle read, so run a sample in your actual thread palette before stitching the final product.
Where to Use Caution With This Design
No design is universal, and the RN nurse file has a few edges that require attention. On very thin fabric, such as lightweight t-shirts or delicate blouses, the fill stitch areas may show some shadowing. Use a lightweight stabilizer and a smaller hoop if possible, and consider reducing the design size slightly to keep the density proportionate to the fabric. On stretchy fabrics like performance knit or ribbed jersey, you will need a good quality cut-away stabilizer and possibly a temporary spray adhesive to prevent shifting. The needle element, while small, can distort if the fabric moves during stitching.
For dark fabric backgrounds, the design will need high-contrast thread colors. A white or pale yellow cap on black fabric works well. A dark blue cap on black fabric will disappear. I also recommend avoiding tiny hoop size extremes. If you try to squeeze this design into a 4x4 hoop at a very small scale, the detail in the needle and the Band-Aid may become muddled. Give it enough room to breathe. For baby embroidery projects on onesies, the design is charming at a moderate size, but keep it away from snaps and seams to avoid needle strikes and distortion.
If you plan to sew this design onto products that need frequent washing, such as kitchen towels, reusable tote bags, or children's apparel, use a high-quality polyester thread and a stable cut-away stabilizer. The satin stitch edges will hold up better over multiple wash cycles if they are not stretched or stressed during the initial stitching. I would also avoid placing the design too close to the edge of a hem or a pocket, where repeated folding and friction could wear the stitches prematurely.
Visual Appeal, Customer Trust, and Product Value
When a customer buys a handmade product featuring the RN nurse design, they are buying recognition. Nurses see that cap and that Band-Aid, and they know immediately that the item was made for them. That emotional connection builds trust and makes the product feel personal rather than mass-produced. For an Etsy seller or a craft business owner, this design allows you to offer something that feels curated. It is not a generic medical cross or a vague heart with a stethoscope. It is specific. It says registered nurse, and that specificity is what drives buyer engagement.
I have used this design in printable mockup images for client previews, and it photographs well. The shapes are distinct enough that they show up clearly in product photos, even at thumbnail size. That is a real advantage for digital product sellers who create mockup bundles or digital previews for their embroidery files. The design also works nicely as a design asset in a larger collection—it pairs well with names, dates, or additional decorative elements without clashing.
For commercial embroidery projects, such as small runs for a medical office or a nursing school reunion, this design has a professional finish that reflects well on the embroiderer. It does not look home-hobby. It looks like a piece of custom apparel that was carefully chosen and well executed. That kind of presentation builds your brand as a shop owner, whether you sell finished products or embroidery file licenses.
Practical Designer Notes Before You Stitch
Before you use the RN nurse embroidery design in a client project or a finished product for your shop, here are a few steps I recommend every designer take.
- Test on scrap fabric first. Use the exact fabric and stabilizer combination you plan to use for the final product. Check the stitch density and make sure the fill areas are smooth and the satin stitches are crisp. Adjust tension if needed.
- Check thread color contrast. View your thread choices on both light and dark fabric backgrounds. What looks good on a white swatch may vanish on a navy sweatshirt. Run a black and white mockup to evaluate contrast objectively.
- Confirm your hoop size. Measure the design dimensions and verify they fit within your hoop before you start. Nothing slows down production like a design that barely fits or requires re-hooping mid-stitch.
- Inspect small details. The needle element is fine. If you scale the design down too much, that detail may become a blur of thread. Keep the size large enough that the needle reads as a needle, not a line.
- Review washability. If the finished product will be washed frequently, use a high-quality thread and a stable cut-away stabilizer. Test a sample through a wash cycle to confirm the design holds.
- Check licensing before selling. If you plan to sell finished products or offer the digital embroidery file as part of a bundle, confirm the license terms that came with your purchase. Respecting usage rights protects your craft business and your reputation.
Final Thoughts on the RN Nurse Embroidery Design
The RN nurse design sits in a sweet spot. It is meaningful without being overly sentimental. It is detailed without being fragile. It is professional without being boring. For anyone in the embroidery business—whether you run a small shop, stitch for Etsy, produce applique design sets, or create commercial embroidery for local clients—this file offers real versatility. I have used it on a sweatshirt embroidery project, a personalized tote, a cap, and even a small embroidered patch for a scrub jacket. It performed well in every context.
If you are considering adding the RN nurse design to your active collection, my advice is straightforward. Test it early, match your stabilizer to your fabric, choose thread colors that contrast well, and then stitch it with confidence. It is a solid, professional machine embroidery design that will serve you across multiple product lines and customer requests. That kind of reliability is exactly what an experienced designer looks for when building a library of design assets that need to perform in real projects, not just in preview windows.